Tag Archives: home improvement

Mounting TVs? Yeah, We Got That

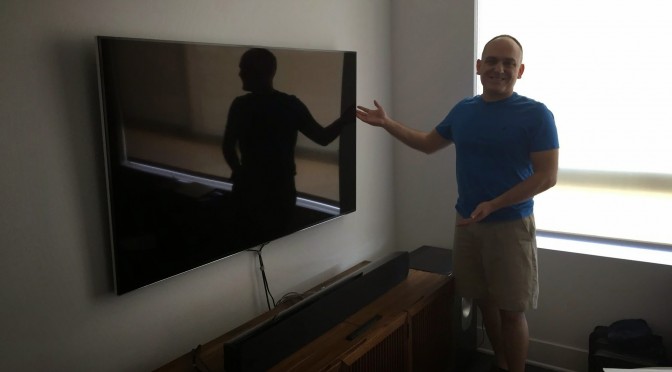
So yesterday was like the most successful day because we did stuff that revolved around TV and we didn’t fuck it up!  I was probably most nervous about this day’s work as it involved our beautiful 65″ TV and I would be devastated if anything happened to it if we did some shoddy handywork.  But after the last few weeks of installing shelves and such, we were pretty goddamn good at doing things around the house.  Yet, I still considered hiring someone, preferably a hot someone, to do this, but we just went ahead and did this anyway.  And guess what?  It fucking worked like a charm!  Mind you, it helped to have found the studs (so to speak) and make sure we did all the proper planning…and in the end, not only was the TV hung properly and awesomely, so were the IKEA Lack shelves on either side.  Man, we know how to make shit look good in the home!!!

April 18, 2015 – Hanging Our TV Up!

Here's the original state, with the TV on its standHere's the original state, with the TV on its stand
Here's the original state, with the TV on its stand18-Apr-2015 11:27, Apple iPhone 6, 2.2, 4.15mm, 0.033 sec, ISO 50
What TV?What TV?
What TV?18-Apr-2015 11:58, Apple iPhone 6, 2.2, 4.15mm, 0.033 sec, ISO 32
Our carefully plotted holes into studs - no anchors for this endeavorOur carefully plotted holes into studs - no anchors for this endeavor
Our carefully plotted holes into studs - no anchors for this endeavor18-Apr-2015 11:58, Apple iPhone 6, 2.2, 4.15mm, 0.033 sec, ISO 50
 
Honestly, that was the hard part.Honestly, that was the hard part.
Honestly, that was the hard part.18-Apr-2015 12:11, Apple iPhone 6, 2.2, 4.15mm, 0.033 sec, ISO 64
Attached the mounts to the back of the TVAttached the mounts to the back of the TV
Attached the mounts to the back of the TV18-Apr-2015 12:40, Apple iPhone 6, 2.2, 4.15mm, 0.067 sec, ISO 250
Voila!  Moonrise Kingdom was our first HD experience with the TV on the wallVoila! Moonrise Kingdom was our first HD experience with the TV on the wall
Voila! Moonrise Kingdom was our first HD experience with the TV on the wall18-Apr-2015 13:45, Apple iPhone 6, 2.2, 4.15mm, 0.033 sec, ISO 125
 
18-Apr-2015 13:45, Apple iPhone 6, 2.2, 4.15mm, 0.033 sec, ISO 125
We weren't done though - we also have IKEA Lack shelves for the sides!We weren't done though - we also have IKEA Lack shelves for the sides!
We weren't done though - we also have IKEA Lack shelves for the sides!18-Apr-2015 13:45, Apple iPhone 6, 2.2, 4.15mm, 0.033 sec, ISO 200
18-Apr-2015 13:50, Apple iPhone 6, 2.2, 4.15mm, 0.033 sec, ISO 125
 
18-Apr-2015 13:50, Apple iPhone 6, 2.2, 4.15mm, 0.033 sec, ISO 64
This Sanus brand was a very good and easy-to-implement choice.  Highly recommended.This Sanus brand was a very good and easy-to-implement choice. Highly recommended.
This Sanus brand was a very good and easy-to-implement choice. Highly recommended.18-Apr-2015 13:58, Apple iPhone 6, 2.2, 4.15mm, 0.025 sec, ISO 40
18-Apr-2015 14:56, Apple iPhone 6, 2.2, 4.15mm, 0.033 sec, ISO 40
 
After assembling one of the shelf units, we realized it had to be lifted off the groundAfter assembling one of the shelf units, we realized it had to be lifted off the ground
After assembling one of the shelf units, we realized it had to be lifted off the ground18-Apr-2015 15:37, Apple iPhone 6, 2.2, 4.15mm, 0.017 sec, ISO 32
So we got these risers to lift the shelf above the baseboardSo we got these risers to lift the shelf above the baseboard
So we got these risers to lift the shelf above the baseboard18-Apr-2015 15:37, Apple iPhone 6, 2.2, 4.15mm, 0.025 sec, ISO 32
Surprisingly, those black risers blended in with the floor.Surprisingly, those black risers blended in with the floor.
Surprisingly, those black risers blended in with the floor.18-Apr-2015 17:25, Apple iPhone 6, 2.2, 4.15mm, 0.033 sec, ISO 40
 

Mounting & Gaming

So I’m ready to be amongst the populace that has their TV mounted on their walls – I actually have the mount ready but it’s one of those things where it’s like, oh shit, I’m kind of nervous about doing the installation.  Where as shelves and such may amount to $100-200 of stuff, if it drops, who cares, you put it back up and move on.  But a big ass TV like ours and then trusting our handiwork to keep it on the wall and not on the floor?  Well, it’ll be interesting.  I think it’ll be fine though.  We’ve made good progress in figuring out how to deal with studs, heh heh heh.

Also, here’s some Episode 1 of Gay of Thrones for you too!

Settled In, It Seems

We’ve finally made it – all the big boxes are unpacked and disposed of.  It’s a thrilling sensation to be done and to be kind of almost all moved in at our new and smaller apartment.  All the work of getting shelving installed has been so satisfying too, as items are finding their real home and our home becomes livable too for us, as that is actually a thing we’ve been making ourselves deal with.  It’s interesting how much you choose to deal with when it’s something you can’t ignore, like boxes all stacked in your dining room area or piles of clothes and linens in your bedroom or an office overrun with crap…you make it all work regardless and get used to it.  But when you get things organized and reclaim that space, it is like, woah, that’s nice.

Yesterday was a productive day too, but I think I felt a little emotional about it as well.  There was the realization I had that Phase 1 of Moving is done and now it’s time to get settled in and make the place ours, and then start actually enjoying the apartment and amenities.  But then it was also realizing that we’re not done yet – just that the boxes are gone.  I actually just got my TV mount for the wall today, we have more shelving coming in for the wine glasses and bar area, and then there will be picture hangings and such.  It’s fun and great to have all this happen, but soooo exhausting.

In random tangents, both Larry & I are so glad to have some of our favorite Spring TV back:  Mad Men and Game of Thrones.  Mad Men‘s final season is airing and it’s been good but also sad because this is the LAST SEASON.  NOOOOO……!!!  It’s not clear where it’s headed, but one thing that does seem kind of apparent is that Don Draper is and will continue to be the same broken and flawed man he was from Season 1.  Game of Thrones is exciting this year as we’re finally at that expected divide when the TV show caught up to the books…and now the show is able to write its own interpretation of what happens next.  George R. R. Martin has given the showrunners an outline of what he has intended the overall story to encompass for the ending, but the details are likely changing regardless.  There are promises that characters will die even book readers will find surprising.   So, those shows are ongoing while Larry & I also are enjoying the third season of House of Cards on Netflix, although that has been slow-going for a few reasons, including my initial PwC travels and then moving.  But we didn’t let all that stop us from binge-watching Netflix’s other new series, The Unbreakable Kimmy Schmidt, which is fucking awesome and funny as hell.

Alright, this was just a word-vomit post for today, but I need to keep trying to get back in the swing of posting and so here we are.  I have some more pics to share too, including a bigger batch from yesterday when Mom and Helen came over to visit.

April 9, 2015 – PwC All Hands in Santa Monica!

Last week there was an All Hands meeting for the group here in SoCal and it was held out on the Westside, kinda near my old stomping grounds.  The traffic was ridiculous, as expected, but not nearly as bad as it could have been.  Even though it felt like a longer ride, it was only an hour or so back to my home in Glendale…although that was with me leaving at 7pm.  I had looked earlier at 5pm and the trip was easily 1.5 hours.  Eff that.  I did enjoy being back on the beach though, but that’s just not enough for me to say I miss the Santa Monica area, as I don’t.

09-Apr-2015 17:34, Apple iPhone 6, 2.2, 4.15mm, 0.001 sec, ISO 32
09-Apr-2015 18:13, Apple iPhone 6, 2.2, 4.15mm, ISO 32
09-Apr-2015 18:13, Apple iPhone 6, 2.2, 4.15mm, 0.001 sec, ISO 32
 
09-Apr-2015 18:13, Apple iPhone 6, 2.2, 4.15mm, 0.001 sec, ISO 32
09-Apr-2015 18:14, Apple iPhone 6, 2.2, 4.15mm, ISO 32
 

April 11, 2015 – Final Stretch….

I have to say this is kind of misleading titling, as while it was a final stretch of boxes and installations, like I rambled about above, there’s still a lot of work.  But at least we’ve gotten so much crap off the floors!

More boxes on their way out
More boxes on their way out11-Apr-2015 12:40, Apple iPhone 6, 2.2, 4.15mm, 0.033 sec, ISO 250
Not just a pic of a bathroom, but a bathroom without boxes!
Not just a pic of a bathroom, but a bathroom without boxes!11-Apr-2015 12:40, Apple iPhone 6, 2.2, 4.15mm, 0.042 sec, ISO 250
Goodwill stuff
Goodwill stuff11-Apr-2015 12:40, Apple iPhone 6, 2.2, 4.15mm, 0.033 sec, ISO 200
 
11-Apr-2015 19:57, Apple iPhone 6, 2.2, 4.15mm, 0.067 sec, ISO 320
11-Apr-2015 20:18, Apple iPhone 6, 2.2, 4.15mm, 0.067 sec, ISO 400
 

April 12, 2015 – Mom and Helen, Some Grilling, and More Home Improvement!

Helen came up to visit mom so they came over to see how we were doing in the getting settled effort.  Mom wasn’t impressed but I reminded her, gently, that it actually was MUCH better than when she saw it and it was a goddamn warzone.  We took them on a tour of the amenities as we hadn’t shown my mom that her last time here as there was work to be done then!  These pics are from the roof deck of the building we live in, not of our own private area.  Our grilling adventures for dinner later that evening were a bit educational – the grills provided around the complex are very nice, but they’re huge.  So we’ve realized that a large grill takes much more to heat up.  The El Pollo Loco chicken recipe requires indirect heat, so to do that in a big grill, you need to use more burners.  Lesson learned, hopefully.

12-Apr-2015 10:52, Apple iPhone 6, 2.2, 4.15mm, 0.033 sec, ISO 125
12-Apr-2015 10:52, Apple iPhone 6, 2.2, 4.15mm, 0.033 sec, ISO 100
12-Apr-2015 10:53, Apple iPhone 6, 2.2, 4.15mm, 0.059 sec, ISO 250
 
12-Apr-2015 11:08, Apple iPhone 6, 2.2, 4.15mm, 0.033 sec, ISO 160
12-Apr-2015 11:08, Apple iPhone 6, 2.2, 4.15mm, 0.033 sec, ISO 200
12-Apr-2015 11:16, Apple iPhone 6, 2.2, 4.15mm, 0.033 sec, ISO 160
 
12-Apr-2015 12:31, Apple iPhone 6, 2.2, 4.15mm, 0.001 sec, ISO 32
12-Apr-2015 12:31, Apple iPhone 6, 2.2, 4.15mm, ISO 32
12-Apr-2015 12:31, Apple iPhone 6, 2.2, 4.15mm, 0.001 sec, ISO 32
 
12-Apr-2015 12:31, Apple iPhone 6, 2.2, 4.15mm, ISO 32
12-Apr-2015 12:32, Apple iPhone 6, 2.2, 4.15mm, ISO 32
 
12-Apr-2015 12:32, Apple iPhone 6, 2.2, 4.15mm, ISO 32
12-Apr-2015 12:32, Apple iPhone 6, 2.2, 4.15mm, 0.001 sec, ISO 32
 

Legs Hurt (T-89)

It would probably have something to do with the fact that I bicycled down Pikes Peak this past Saturday morning!

My dad saw in one of those tourism guides this really cool ‘Thing-To-Do’ in Colorado Springs: Bike down Pikes Peak. Here’s the website link for the company that does it (www.bikithikit.com), because if you really want to bike down the mountain, you have to do it through this company or one just like it, as special permits are required. Those of you who don’t feel like visiting the website though, here’s the scoop: you meet at this place in Old Colorado City at 6:15am and after signing away all the waivers, getting fitted for a helmet, and getting some grub, you pile in their van (which has the bikes you use on top) and drive up to the summit of Pikes Peak (weather permitting) via Pikes Peak Highway. You definitely want to do the morning run (a morning and an afternoon one are offered), as afternoons here on the Front Range are notorious for turning stormy like clockwork at right around 3:30pm. We had a small group (only 3 of us) and there were 3 staff members to go with us, so it was kind of nice. Apparently once summer vacation gets into full swing that’s when it’s super packed. Anyways, our weather was tremendous this Saturday morning. Crystal clear skies and beautiful temperatures. Melissa, Sara, and Daniel drove us up the road, which is actually quite a scary ride, especially in a big ol’ van. There are numerous points on the drive up there when it’s a nice big drop off off to the side and as we were heading up the mountain, I realized the road was really steep in most places, especially as you really head up the mountain. The views were astounding though. Finally, around 7:45 or so, we were at the top of the mountain and after a few briefings on safety and operation, we were on our way. The van follows you from behind so as to block any cars from running you off the road, which is very nice. I ended up going the slowest because honestly I haven’t been on a bike in forever and when you’re that high up and on that steep of a road, definitely nerves came into play. By the end I was going faster, but at that top part, where you’re freezing, the wind is blowing like hell, and the road is filled with bumps and it’s really not even a road at many points, it’s a tad overwhelming. But those were the only things I could even think about calling concerns as the adventure was amazing! You can see forever. It’s invigorating being out there before most people are up yet on a Saturday. The road was very sparse with traffic at the top. Closer to the fishing reservoirs it definitely got more crowded, but still, you’re immersed in such amazing natural scenery you don’t care. And all you hear, while you’re FLYING down the road, especially in the last third of the ride, is the wind. It’s awesome. Dad and I definitely had an awesome time. The pictures below can speak to the amazing journey it is – and if you ever have the inkling and the opportunity to do this, don’t even hesitate. Sign up. The fee covers the bike and helmet rental, the fee to get on the Pikes Peak highway, free food and snacks before and during, and a free lunch at the end of the ride at the Wines of Colorado restaurant, which is definitely a great way to end the trip. So do it!!!!

2 Jun 2007 – Bike Riding down Pikes Peak!

A pretty sweet stitched together photo from the summit - right side had a bad line though!A pretty sweet stitched together photo from the summit - right side had a bad line though!
A pretty sweet stitched together photo from the summit - right side had a bad line though!
Here's the route you drive up and bicycle downHere's the route you drive up and bicycle down
Here's the route you drive up and bicycle down02-Jun-2007 06:25, Canon Canon PowerShot SD900, 8.0, 7.7mm, 0.017 sec
02-Jun-2007 06:26, Canon Canon PowerShot SD900, 2.8, 7.7mm, 0.04 sec, ISO 141
 
02-Jun-2007 07:54, Canon Canon PowerShot SD900, 8.0, 7.7mm, 0.003 sec
02-Jun-2007 07:54, Canon Canon PowerShot SD900, 8.0, 7.7mm, 0.002 sec
02-Jun-2007 07:54, Canon Canon PowerShot SD900, 8.0, 7.7mm, 0.003 sec
 
Dad at the Railway summitDad at the Railway summit
Dad at the Railway summit02-Jun-2007 07:55, Canon Canon PowerShot SD900, 8.0, 7.7mm, 0.003 sec
Me giving the thumbs upMe giving the thumbs up
Me giving the thumbs up02-Jun-2007 07:55, Canon Canon PowerShot SD900, 8.0, 7.7mm, 0.004 sec
Somehow I missed these the first go-round: Here's my Dad at the top before the ride startedSomehow I missed these the first go-round: Here's my Dad at the top before the ride started
Somehow I missed these the first go-round: Here's my Dad at the top before the ride started02-Jun-2007 08:01, Canon Canon PowerShot SD900, 8.0, 7.7mm, 0.004 sec
 
And me too!And me too!
And me too!02-Jun-2007 08:01, Canon Canon PowerShot SD900, 8.0, 7.7mm, 0.004 sec
Blurry pic of the van at the topBlurry pic of the van at the top
Blurry pic of the van at the top02-Jun-2007 08:03, Canon Canon PowerShot SD900, 2.8, 7.7mm, 0.002 sec
Another group of folks who were getting ready to snowboard the mountainAnother group of folks who were getting ready to snowboard the mountain
Another group of folks who were getting ready to snowboard the mountain02-Jun-2007 08:11, Canon Canon PowerShot SD900, 8.0, 7.7mm, 0.003 sec
 
02-Jun-2007 08:13, Canon Canon PowerShot SD900, 8.0, 7.7mm, 0.006 sec
Typical Tourist...Typical Tourist...
Typical Tourist...02-Jun-2007 08:14, Canon Canon PowerShot SD900, 8.0, 7.7mm, 0.013 sec
Here's the beginning/end of the road!Here's the beginning/end of the road!
Here's the beginning/end of the road!02-Jun-2007 08:15, Canon Canon PowerShot SD900, 8.0, 7.7mm, 0.004 sec
 

And to finish off the pictures of my bathroom project, I present to you one last pic with the new lighting and the new shelf I put in. There are still things to be fixed because of installation ‘concerns’ (okay, I’ll fess up: the old lighting, when removed, showed that the electric casing with all the connections was NOT centered on the old or new mirror. And my new lighting only has a central circular connection to the wall, so that still has to be patched over as we had to get ‘creative’ in bringing the wires to the middle; plus, the two remaining walls need to be painted pure white as well). Regardless, my bathroom rocks. Now I really have to think as to what I would want to do next to my house. I think my living room needs some reorganization, but nothing major or Lowe’s related…? Anyways, back to work for another fun week, I’m sure. Oh joy.

03-Jun-2007 19:47, Canon Canon PowerShot SD900, 2.8, 7.7mm, 0.017 sec, ISO 124
 

Nearly completed (T-94)

The 5-day Memorial Day weekend I just had was not exactly relaxing, but productive for sure!

Besides hanging out w/ friends at night, most of my weekend was spent working on the bathroom with Dad and Pat, so my ‘vacation’ was much more work than even my real ‘work’ is. Which leads me to explain why I was so damn tired at work today and why I came home and just passed out. But I’m awake now and before I return to sleep, I wanted to post my complete picture set of my bathroom renovation, from beginning to end. Okay, the true end has yet to be reached (the whole replacing the lights and putting up the shelves) but those pictures will come soon enough. I’ll also get to posting pictures from the Royal Gorge which I visited with Dad and Pat on Thursday. Get this – this upcoming Friday I’ll be riding down Pikes Peak with my Dad on bicycles. This should definitely be interesting as long as the weather holds out, which it usually does until the afternoon. I hope I can take lots of pictures from that, as it should be amazing.

Alright, so here’s my photos from the bathroom project:

The Lisa Dr Master Bathroom Renovation Project – May 2007

You wanna know what the catalyst was that actually got me working on this? The damn towel bar. Last weekend, I had just finished drying off after showering and when I put the towel back on the rack, the bar just fell off the wall. I couldn’t snap the bar back on (although I know what I was doing wrong now), so I was like, Fuck It, I’ll Just Buy a New One… and that my friends, is the starting point of this whole endeavor. For now I was thinking, hell, I’ll get the towel bar that will match what I’ve been planning. But now that I had gotten one piece of my new bathroom, it was time to just go for it, and with a long weekend approaching, what better time?

And to be honest, I’ve been planning how I wanted this renovation to go for a pretty long time. You can see past journal entries with my drawing proposals, and I think the final result is pretty close to those. And because of my hours and hours of hanging out at Lowe’s researching what I wanted to install, the only time I really spent this weekend was fortunately on installation and not what I wanted to do. Except for the walls – I still hadn’t figured out what I wanted to do with that until that afternoon.

I definitely couldn’t have done this without my Dad (and Pat) so much thanks goes to them for helping and doing so much on this project. Plus, the books below were INVALUABLE to my efforts and I heartily recommend them to anyone else considering some DIY work:

– Popular Mechanics’ Moneysmart Makeovers: Bathrooms (This book is an AMAZING resource for all aspects of this project – got this for 75% off at Barnes & Noble’s discount rack; best deal ever)
– Stanley: Complete Plumbing (helpful for figuring out the nuances of plumbing, pipes, etc)
– Stanley: Complete Tiling (essential for making decisions on what to use for my floor, installing, removing fixtures, etc)
– Lowe’s Complete Guide to Paint and Color (extremely helpful for painting techniques)
– DIY Channel: 10 Weekend Bathroom Makeovers (great for ideas and instructional how-tos on certain techniques)

With all the reading I had done for this project, really I was mentally ready. But my biggest holdup had been fear of actual execution – but as you’ll see below, that quickly went away. Especially once you’ve completed ‘Demolition Day’. You’re committed at that point!

24 May 2007 – My Bathroom before the renovation

My MBR bathroom in its "before" state
My MBR bathroom in its "before" state24-May-2007 16:04, Canon Canon PowerShot SD900, 2.8, 7.7mm, 0.017 sec, ISO 141
View of the mirrors
View of the mirrors24-May-2007 16:04, Canon Canon PowerShot SD900, 2.8, 7.7mm, 0.017 sec, ISO 141
Your days are numbered, vanity
Your days are numbered, vanity24-May-2007 16:04, Canon Canon PowerShot SD900, 8.0, 7.7mm, 0.017 sec, ISO 141
 
Almost time to say goodbye, old linoleum
Almost time to say goodbye, old linoleum24-May-2007 16:05, Canon Canon PowerShot SD900, 2.8, 7.7mm, 0.017 sec, ISO 141
View with the wooden shelving unit gone
View with the wooden shelving unit gone24-May-2007 16:59, Canon Canon PowerShot SD900, 2.8, 7.7mm, 0.017 sec, ISO 141
An idea of what the new tile will look like
An idea of what the new tile will look like24-May-2007 16:59, Canon Canon PowerShot SD900, 2.8, 7.7mm, 0.017 sec, ISO 141
 

25 May 2007 – Demolition Day

Dad arrived in the morning to help me tear all the guts out of my existing Master bathroom. The first goal was to get rid of the vanity/sink combo. What a bitch that was. First, we discovered that the existing vanity had a back wall and no big holes for the vanity to allow the supply valves through. So we had to cut those out after first trying to disassemble them. That was a lot of effort but fortunately, it did come out eventually. Also, while I went on a Lowe’s run, Dad got the mirror off the wall without shattering it (which was one thing I was sure would happen!). While that may sound like not much work, it in fact took from 9 to Noon, at which point Dad went home. I then proceeded to take the toilet out, which went much easier than I expected thanks to all my books. Then the REALLY fun part occurred: taking the linoleum out. It was easy enough to peel that stuff off, but it was the remaining adhesive that was the real beyotch. I did get adhesive remover (like wallpaper remover), but you have to cut through the paper so that the remover can soak through. After cutting at the floor like a mental patient, I then let the remover soak for an hour, then it was scraper time. Thank God I had bought that scraper or else I would have left my back and vertebrae back there in agony. After many pauses to pick up all the pieces, my wooden subfloor was finally cleaned off and ready for tomorrow’s fun: Putting all new tile back down.

I duct-taped the HELL out of this mirror preparing for the shatter that never happened
I duct-taped the HELL out of this mirror preparing for the shatter that never happened25-May-2007 08:39, Canon Canon PowerShot SD900, 2.8, 7.7mm, 0.017 sec, ISO 141
An emptied out vanity cabinet
An emptied out vanity cabinet25-May-2007 08:58, Canon Canon PowerShot SD900, 2.8, 7.7mm, 0.017 sec, ISO 141
Picture of the piping for future reference just in case
Picture of the piping for future reference just in case25-May-2007 08:58, Canon Canon PowerShot SD900, 2.8, 7.7mm, 0.017 sec, ISO 141
 
My Dad affected by the sewer fumes, presumably... (I see where I get my weird faces from)
My Dad affected by the sewer fumes, presumably... (I see where I get my weird faces from)25-May-2007 11:02, Canon Canon PowerShot SD900, 2.8, 7.7mm, 0.017 sec, ISO 141
The vanity and sink are outta there
The vanity and sink are outta there25-May-2007 11:19, Canon Canon PowerShot SD900, 8.0, 7.7mm, 0.017 sec, ISO 141
You can see how the mirror had been glued up
You can see how the mirror had been glued up25-May-2007 11:19, Canon Canon PowerShot SD900, 2.8, 7.7mm, 0.02 sec, ISO 141
 
The baseboards are gone and the toilet is next
The baseboards are gone and the toilet is next25-May-2007 12:11, Canon Canon PowerShot SD900, 8.0, 7.7mm, 0.017 sec, ISO 141
More baseboard removal
More baseboard removal25-May-2007 12:12, Canon Canon PowerShot SD900, 2.8, 7.7mm, 0.017 sec, ISO 141
The toilet tank taken off...
The toilet tank taken off...25-May-2007 12:46, Canon Canon PowerShot SD900, 2.8, 7.7mm, 0.017 sec, ISO 141
 
...and at it's new home for the next few days
...and at it's new home for the next few days25-May-2007 12:46, Canon Canon PowerShot SD900, 2.8, 7.7mm, 0.017 sec, ISO 141
The toilet bowl lifted off the ground with the sewer plugged up
The toilet bowl lifted off the ground with the sewer plugged up25-May-2007 13:07, Canon Canon PowerShot SD900, 2.8, 7.7mm, 0.017 sec, ISO 141
There's the wax ring that keeps your bathroom from filling up with swamp gas
There's the wax ring that keeps your bathroom from filling up with swamp gas25-May-2007 13:07, Canon Canon PowerShot SD900, 8.0, 7.7mm, 0.017 sec, ISO 141
 
It looks worse than it really actually is
It looks worse than it really actually is25-May-2007 13:09, Canon Canon PowerShot SD900, 8.0, 7.7mm, 0.017 sec, ISO 141
25-May-2007 13:10, Canon Canon PowerShot SD900, 8.0, 7.7mm, 0.017 sec, ISO 141
Peeling the crappy linoleum up...
Peeling the crappy linoleum up...25-May-2007 13:34, Canon Canon PowerShot SD900, 2.8, 7.7mm, 0.017 sec, ISO 141
 

26 May 2007 – Laying the Tile and Getting the Walls Right

The next day, Dad and Pat and the dogs all came up promptly at 0900 (to be known as the start of the work day from here on out this weekend). Today’s fun was to be focused on getting the room’s floor and walls worked on as you can’t really put all the other items in until those core functions are taken care of first. Obviously the first thing to do was to get the floor put in place. I had chosen to go with individual vinyl tiles for my floor as it was one of the easier things to do-it-yourself and not too expensive nor does it take a lot of work and time to install. I had definitely considered going the ceramic tile route, but my only holdback on that was all the necessary prep and post work needed for a proper tile floor. Getting a concreteboard subfloor, properly mixing the mortar and applying it properly, placing the tiles without fucking it up, letting the mortar set, then mixing and applying the grout, cleaning that all off, sealing the floor properly….yeah, maybe one day. But not this time. With vinyl tiles, it’s all about laying an adhesive primer on the floor and then laying the self-adhesive tiles on the floor in the right place. After that, you’re done. Sweet. So that’s what me and Dad did, with Dad becoming an expert tile cutter in the process. That did take a few hours, and then Dad and Pat went home for the afternoon.

At this point, I knew I had to still figure out what the hell I wanted to do with my walls. I had always envisioned a split-wall design with a chair rail being a breakpoint for the walls, but I just couldn’t find the right color. I initially envisioned a solid color for the blue lower part of the wall, but none of the blues I looked at meshed just right with the blues on the tile…but that was because there are two blues on the tile and trying to pick just one is nearly impossible. Then I thought maybe I’d tile the wall up to the chair rail point, but like I mentioned above, tiling takes a LOT of work. It looks great, for sure, but that’s if you know what you are doing. I don’t, at least with tile just yet. But with paint and color, I certainly do. So while wandering around Lowe’s for inspiration, I actually did find it – at the faux finishing section of the paint aisle. I found a few ideas immediately right there, first with a metallic finish that I thought would be cool and then a secondary stippling idea that I wasn’t too impressed with but I took home anyways just to consider it. At home, I realized the metallic idea, while cool, just wasn’t right for what my bathroom tiles had in them. Then the stippling idea took center stage – and I then saw that it matched the pattern on the tile perfectly. So back to Lowe’s I went and got those supplies (the base paint, the translucent glaze and a stippling brush) and applied the base coat that afternoon. You had to let it dry completely before putting the glaze on, so off I went with my friends that evening to see Pirates of the Caribbean 3!

Perhaps Dad is reacting to the adhesive smell?
Perhaps Dad is reacting to the adhesive smell?26-May-2007 10:47, Canon Canon PowerShot SD900, 2.8, 7.7mm, 0.017 sec, ISO 141
Me hard at work tiling the floor
Me hard at work tiling the floor26-May-2007 10:53, Canon Canon PowerShot SD900, 2.8, 7.7mm, 0.017 sec, ISO 141
I LOVE tiling
I LOVE tiling26-May-2007 10:53, Canon Canon PowerShot SD900, 2.8, 7.7mm, 0.017 sec, ISO 141
 
All the full tiles in place
All the full tiles in place26-May-2007 11:00, Canon Canon PowerShot SD900, 2.8, 7.7mm, 0.017 sec, ISO 141
Now the fun part with custom-cutting tiles to fit the small areas
Now the fun part with custom-cutting tiles to fit the small areas26-May-2007 11:23, Canon Canon PowerShot SD900, 2.8, 7.7mm, 0.017 sec, ISO 141
Ta-Dah!
Ta-Dah!26-May-2007 12:48, Canon Canon PowerShot SD900, 2.8, 7.7mm, 0.017 sec, ISO 141
 
The base coat of Midnight Blue satin paint up and ready
The base coat of Midnight Blue satin paint up and ready26-May-2007 19:00, Canon Canon PowerShot SD900, 2.8, 7.7mm, 0.017 sec, ISO 141
A slightly lighter view
A slightly lighter view26-May-2007 19:00, Canon Canon PowerShot SD900, 2.8, 7.7mm, 0.077 sec, ISO 141
Getting an idea of the color with the tile floor
Getting an idea of the color with the tile floor26-May-2007 19:21, Canon Canon PowerShot SD900, 2.8, 7.7mm, 0.017 sec, ISO 141
 
Where the new vanity would go
Where the new vanity would go26-May-2007 20:27, Canon Canon PowerShot SD900, 2.8, 7.7mm, 0.017 sec, ISO 141
 

27 May 2007 – Finishing the Paint and getting the vanity/sink ready

My faux finishing needed to get completed before we could do too much so that was what I got knocked out of the way first – going to town on the blue base coat with the Bluebell glaze on a stippling brush. I made sure to practice my technique on those parts of the wall sure to be covered by the vanity, so I think that by the time I got to highly visible walls, I didn’t do that bad a job. I’m sure experts would agree that my end result is not exactly what stippling is supposed to look like, but I like the end result and it looks freakishly like the blue pattern in the floor tiles, which is what I was going for. So score one for me!

After that was done, then it was time to determine ideal placement of the vanity with the sink on it, and to also get the baseboard and chair rail replacements, which is what Dad and I spent some time at Lowe’s accomplishing. Once we got back (Lowe’s on the weekends is certainly more crowded than on weekdays and evenings, let me tell you), Dad was able to show me how to successfully use my brand new jigsaw to cut pieces of baseboard and install them (even using a finishing nail set!). They went home and I ended up finishing most of the baseboards, securing the vanity to the wall, installing the new Delta faucet to my sink, and mounting the sink to the vanity and wall. Finally, I was able to succesfully reattach the toilet to the floor and have it work again, without leaks. Sweet. After all that excitement, I went over to Jeff’s for Game Night, which involved a great round of Uno Attack! (I have yet to meet someone who after playing this game didn’t Love it) and a game called Shout at TV which I rocked at. We even played a second round in which 7 of them played against me and I still won.

My stippling efforts done - I like it!
My stippling efforts done - I like it!27-May-2007 13:04, Canon Canon PowerShot SD900, 2.8, 7.7mm, 0.017 sec, ISO 141
Where the vanity would go
Where the vanity would go27-May-2007 13:04, Canon Canon PowerShot SD900, 2.8, 7.7mm, 0.017 sec, ISO 141
My window seat slash tool bench
My window seat slash tool bench27-May-2007 13:04, Canon Canon PowerShot SD900, 2.8, 7.7mm, 0.017 sec, ISO 141
 
First piece of baseboard installed
First piece of baseboard installed27-May-2007 14:03, Canon Canon PowerShot SD900, 2.8, 7.7mm, 0.017 sec, ISO 141
The sink and faucet are one
The sink and faucet are one27-May-2007 14:23, Canon Canon PowerShot SD900, 2.8, 7.7mm, 0.017 sec, ISO 141
Vanity in its new home
Vanity in its new home27-May-2007 16:05, Canon Canon PowerShot SD900, 2.8, 7.7mm, 0.017 sec, ISO 141
 
With the sink now in place too
With the sink now in place too27-May-2007 17:01, Canon Canon PowerShot SD900, 2.8, 7.7mm, 0.017 sec, ISO 141
Baseboard behind the toilet installed...
Baseboard behind the toilet installed...27-May-2007 17:01, Canon Canon PowerShot SD900, 2.8, 7.7mm, 0.017 sec, ISO 141
...because it was time to make the toilet work again
...because it was time to make the toilet work again27-May-2007 17:43, Canon Canon PowerShot SD900, 2.8, 7.7mm, 0.017 sec, ISO 141
 
Final piece of long baseboarding installed on the towel wall
Final piece of long baseboarding installed on the towel wall27-May-2007 18:56, Canon Canon PowerShot SD900, 2.8, 7.7mm, 0.017 sec, ISO 141
Detail of Toilet and Sink
Detail of Toilet and Sink27-May-2007 18:56, Canon Canon PowerShot SD900, 2.8, 7.7mm, 0.017 sec, ISO 141
There's my tool bench again
There's my tool bench again27-May-2007 18:56, Canon Canon PowerShot SD900, 2.8, 7.7mm, 0.017 sec, ISO 141
 
Grimacing Susan at Game Night
Grimacing Susan at Game Night27-May-2007 21:57, Canon Canon PowerShot SD900, 2.8, 7.7mm, 0.017 sec, ISO 141
Dallas loves game night
Dallas loves game night27-May-2007 21:57, Canon Canon PowerShot SD900, 2.8, 7.7mm, 0.017 sec, ISO 141
Dave and Jeff getting some snacks
Dave and Jeff getting some snacks27-May-2007 21:57, Canon Canon PowerShot SD900, 2.8, 7.7mm, 0.017 sec, ISO 141
 

28 May(+) 2007 – Finishing Touches

Day 4 of the project found me ready for it to be done. It was very cool to have done this on our own, but after a certain amount of time, I think I was ready for a break but I also knew it had to be done. Regardless, I probably wasn’t the most happy person this day; grouchy may be more accurate of a term. Added to my mood was the fact that I hadn’t connected the faucet correctly to the sink (it leaked the first time) and that we had to get more plumbing stuff as the supply lines from the old faucet were too short for this one and we had to get more drain pipe. Luckily Dad knows a thing or two about all this stuff and was able to get it all working wonderfully. Sorry for being a jerk that day, dad! After all that fun, including hanging the new mirror (which went pretty easily as it had one of those self-leveling hanger bars), Dad and Pat left and I did some of the easier finishing touches, like putting up all the new chrome fixtures and painting the upper walls white (turns out that while I thought the original color was white, I was wrong – in fact it’s quite obvious now that it was a very off white/brown color; who knew?). All that remains now is for the lighting to be replaced and for my shelves to go up. I think I’ve found a place for my vertical shades-of-blue harbor painting as well. Sweet.

Anyways, here are photos from what my bathroom currently looks like (sans new lights and shelves). Expect to see the 100% completion pics sometime this upcoming weekend.

Working on the fun plumbing aspect of the vanity and sink
Working on the fun plumbing aspect of the vanity and sink28-May-2007 11:58, Canon Canon PowerShot SD900, 2.8, 7.7mm, 0.017 sec, ISO 183
Ah...done. You can see the blue rug back in place as well as the new chrome TP holder
Ah...done. You can see the blue rug back in place as well as the new chrome TP holder28-May-2007 18:54, Canon Canon PowerShot SD900, 2.8, 7.7mm, 0.017 sec, ISO 141
Towel wall
Towel wall28-May-2007 18:54, Canon Canon PowerShot SD900, 2.8, 7.7mm, 0.017 sec, ISO 141
 
28-May-2007 18:54, Canon Canon PowerShot SD900, 8.0, 7.7mm, 0.017 sec, ISO 141
Notice the new mirror and shelf over my sweet sink
Notice the new mirror and shelf over my sweet sink28-May-2007 18:54, Canon Canon PowerShot SD900, 2.8, 7.7mm, 0.017 sec, ISO 141
Towel wall
Towel wall28-May-2007 18:55, Canon Canon PowerShot SD900, 8.0, 7.7mm, 0.017 sec, ISO 141
 
29-May-2007 21:03, Canon Canon PowerShot SD900, 2.8, 7.7mm, 0.017 sec, ISO 141
View from the shower
View from the shower29-May-2007 21:03, Canon Canon PowerShot SD900, 2.8, 7.7mm, 0.1 sec, ISO 141
29-May-2007 21:04, Canon Canon PowerShot SD900, 2.8, 7.7mm, 0.1 sec, ISO 141
 
Detail on the Delta faucet
Detail on the Delta faucet29-May-2007 21:04, Canon Canon PowerShot SD900, 2.8, 7.7mm, 0.077 sec, ISO 141
Detail on the sink
Detail on the sink29-May-2007 21:05, Canon Canon PowerShot SD900, 8.0, 7.7mm, 0.017 sec, ISO 141
29-May-2007 21:05, Canon Canon PowerShot SD900, 8.0, 7.7mm, 0.017 sec, ISO 141
 
Hand towel and mirror detail
Hand towel and mirror detail29-May-2007 21:05, Canon Canon PowerShot SD900, 2.8, 7.7mm, 0.05 sec, ISO 141