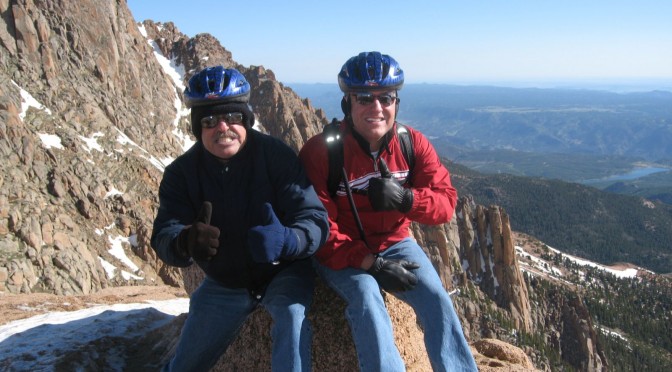
The 5-day Memorial Day weekend I just had was not exactly relaxing, but productive for sure!
Besides hanging out w/ friends at night, most of my weekend was spent working on the bathroom with Dad and Pat, so my ‘vacation’ was much more work than even my real ‘work’ is. Which leads me to explain why I was so damn tired at work today and why I came home and just passed out. But I’m awake now and before I return to sleep, I wanted to post my complete picture set of my bathroom renovation, from beginning to end. Okay, the true end has yet to be reached (the whole replacing the lights and putting up the shelves) but those pictures will come soon enough. I’ll also get to posting pictures from the Royal Gorge which I visited with Dad and Pat on Thursday. Get this – this upcoming Friday I’ll be riding down Pikes Peak with my Dad on bicycles. This should definitely be interesting as long as the weather holds out, which it usually does until the afternoon. I hope I can take lots of pictures from that, as it should be amazing.
Alright, so here’s my photos from the bathroom project:
The Lisa Dr Master Bathroom Renovation Project – May 2007
You wanna know what the catalyst was that actually got me working on this? The damn towel bar. Last weekend, I had just finished drying off after showering and when I put the towel back on the rack, the bar just fell off the wall. I couldn’t snap the bar back on (although I know what I was doing wrong now), so I was like, Fuck It, I’ll Just Buy a New One… and that my friends, is the starting point of this whole endeavor. For now I was thinking, hell, I’ll get the towel bar that will match what I’ve been planning. But now that I had gotten one piece of my new bathroom, it was time to just go for it, and with a long weekend approaching, what better time?
And to be honest, I’ve been planning how I wanted this renovation to go for a pretty long time. You can see past journal entries with my drawing proposals, and I think the final result is pretty close to those. And because of my hours and hours of hanging out at Lowe’s researching what I wanted to install, the only time I really spent this weekend was fortunately on installation and not what I wanted to do. Except for the walls – I still hadn’t figured out what I wanted to do with that until that afternoon.
I definitely couldn’t have done this without my Dad (and Pat) so much thanks goes to them for helping and doing so much on this project. Plus, the books below were INVALUABLE to my efforts and I heartily recommend them to anyone else considering some DIY work:
– Popular Mechanics’ Moneysmart Makeovers: Bathrooms (This book is an AMAZING resource for all aspects of this project – got this for 75% off at Barnes & Noble’s discount rack; best deal ever)
– Stanley: Complete Plumbing (helpful for figuring out the nuances of plumbing, pipes, etc)
– Stanley: Complete Tiling (essential for making decisions on what to use for my floor, installing, removing fixtures, etc)
– Lowe’s Complete Guide to Paint and Color (extremely helpful for painting techniques)
– DIY Channel: 10 Weekend Bathroom Makeovers (great for ideas and instructional how-tos on certain techniques)
With all the reading I had done for this project, really I was mentally ready. But my biggest holdup had been fear of actual execution – but as you’ll see below, that quickly went away. Especially once you’ve completed ‘Demolition Day’. You’re committed at that point!
24 May 2007 – My Bathroom before the renovation

My MBR bathroom in its "before" state
24-May-2007 16:04, Canon Canon PowerShot SD900, 2.8, 7.7mm, 0.017 sec, ISO 141

View of the mirrors
24-May-2007 16:04, Canon Canon PowerShot SD900, 2.8, 7.7mm, 0.017 sec, ISO 141

Your days are numbered, vanity
24-May-2007 16:04, Canon Canon PowerShot SD900, 8.0, 7.7mm, 0.017 sec, ISO 141

Almost time to say goodbye, old linoleum
24-May-2007 16:05, Canon Canon PowerShot SD900, 2.8, 7.7mm, 0.017 sec, ISO 141

View with the wooden shelving unit gone
24-May-2007 16:59, Canon Canon PowerShot SD900, 2.8, 7.7mm, 0.017 sec, ISO 141

An idea of what the new tile will look like
24-May-2007 16:59, Canon Canon PowerShot SD900, 2.8, 7.7mm, 0.017 sec, ISO 141
25 May 2007 – Demolition Day
Dad arrived in the morning to help me tear all the guts out of my existing Master bathroom. The first goal was to get rid of the vanity/sink combo. What a bitch that was. First, we discovered that the existing vanity had a back wall and no big holes for the vanity to allow the supply valves through. So we had to cut those out after first trying to disassemble them. That was a lot of effort but fortunately, it did come out eventually. Also, while I went on a Lowe’s run, Dad got the mirror off the wall without shattering it (which was one thing I was sure would happen!). While that may sound like not much work, it in fact took from 9 to Noon, at which point Dad went home. I then proceeded to take the toilet out, which went much easier than I expected thanks to all my books. Then the REALLY fun part occurred: taking the linoleum out. It was easy enough to peel that stuff off, but it was the remaining adhesive that was the real beyotch. I did get adhesive remover (like wallpaper remover), but you have to cut through the paper so that the remover can soak through. After cutting at the floor like a mental patient, I then let the remover soak for an hour, then it was scraper time. Thank God I had bought that scraper or else I would have left my back and vertebrae back there in agony. After many pauses to pick up all the pieces, my wooden subfloor was finally cleaned off and ready for tomorrow’s fun: Putting all new tile back down.

I duct-taped the HELL out of this mirror preparing for the shatter that never happened
25-May-2007 08:39, Canon Canon PowerShot SD900, 2.8, 7.7mm, 0.017 sec, ISO 141

An emptied out vanity cabinet
25-May-2007 08:58, Canon Canon PowerShot SD900, 2.8, 7.7mm, 0.017 sec, ISO 141

Picture of the piping for future reference just in case
25-May-2007 08:58, Canon Canon PowerShot SD900, 2.8, 7.7mm, 0.017 sec, ISO 141

My Dad affected by the sewer fumes, presumably... (I see where I get my weird faces from)
25-May-2007 11:02, Canon Canon PowerShot SD900, 2.8, 7.7mm, 0.017 sec, ISO 141

The vanity and sink are outta there
25-May-2007 11:19, Canon Canon PowerShot SD900, 8.0, 7.7mm, 0.017 sec, ISO 141

You can see how the mirror had been glued up
25-May-2007 11:19, Canon Canon PowerShot SD900, 2.8, 7.7mm, 0.02 sec, ISO 141

The baseboards are gone and the toilet is next
25-May-2007 12:11, Canon Canon PowerShot SD900, 8.0, 7.7mm, 0.017 sec, ISO 141

More baseboard removal
25-May-2007 12:12, Canon Canon PowerShot SD900, 2.8, 7.7mm, 0.017 sec, ISO 141

The toilet tank taken off...
25-May-2007 12:46, Canon Canon PowerShot SD900, 2.8, 7.7mm, 0.017 sec, ISO 141

...and at it's new home for the next few days
25-May-2007 12:46, Canon Canon PowerShot SD900, 2.8, 7.7mm, 0.017 sec, ISO 141

The toilet bowl lifted off the ground with the sewer plugged up
25-May-2007 13:07, Canon Canon PowerShot SD900, 2.8, 7.7mm, 0.017 sec, ISO 141

There's the wax ring that keeps your bathroom from filling up with swamp gas
25-May-2007 13:07, Canon Canon PowerShot SD900, 8.0, 7.7mm, 0.017 sec, ISO 141

It looks worse than it really actually is
25-May-2007 13:09, Canon Canon PowerShot SD900, 8.0, 7.7mm, 0.017 sec, ISO 141

25-May-2007 13:10, Canon Canon PowerShot SD900, 8.0, 7.7mm, 0.017 sec, ISO 141

Peeling the crappy linoleum up...
25-May-2007 13:34, Canon Canon PowerShot SD900, 2.8, 7.7mm, 0.017 sec, ISO 141

...but leaving a whole lot of adhesive behind
25-May-2007 13:58, Canon Canon PowerShot SD900, 2.8, 7.7mm, 0.017 sec, ISO 141

HAHA! Take that adhesive.
25-May-2007 14:47, Canon Canon PowerShot SD900, 2.8, 7.7mm, 0.017 sec, ISO 141

The floor is cleared off for tiling goodness
25-May-2007 16:12, Canon Canon PowerShot SD900, 2.8, 7.7mm, 0.017 sec, ISO 141

Me and Jeremy at his and Jeff's hot tub - much needed after the work from that day
25-May-2007 21:30, SONY DSC-W100, 2.8, 7.9mm, 0.025 sec, ISO 320

One more picture
25-May-2007 21:30, SONY DSC-W100, 2.8, 7.9mm, 0.025 sec, ISO 320
26 May 2007 – Laying the Tile and Getting the Walls Right
The next day, Dad and Pat and the dogs all came up promptly at 0900 (to be known as the start of the work day from here on out this weekend). Today’s fun was to be focused on getting the room’s floor and walls worked on as you can’t really put all the other items in until those core functions are taken care of first. Obviously the first thing to do was to get the floor put in place. I had chosen to go with individual vinyl tiles for my floor as it was one of the easier things to do-it-yourself and not too expensive nor does it take a lot of work and time to install. I had definitely considered going the ceramic tile route, but my only holdback on that was all the necessary prep and post work needed for a proper tile floor. Getting a concreteboard subfloor, properly mixing the mortar and applying it properly, placing the tiles without fucking it up, letting the mortar set, then mixing and applying the grout, cleaning that all off, sealing the floor properly….yeah, maybe one day. But not this time. With vinyl tiles, it’s all about laying an adhesive primer on the floor and then laying the self-adhesive tiles on the floor in the right place. After that, you’re done. Sweet. So that’s what me and Dad did, with Dad becoming an expert tile cutter in the process. That did take a few hours, and then Dad and Pat went home for the afternoon.
At this point, I knew I had to still figure out what the hell I wanted to do with my walls. I had always envisioned a split-wall design with a chair rail being a breakpoint for the walls, but I just couldn’t find the right color. I initially envisioned a solid color for the blue lower part of the wall, but none of the blues I looked at meshed just right with the blues on the tile…but that was because there are two blues on the tile and trying to pick just one is nearly impossible. Then I thought maybe I’d tile the wall up to the chair rail point, but like I mentioned above, tiling takes a LOT of work. It looks great, for sure, but that’s if you know what you are doing. I don’t, at least with tile just yet. But with paint and color, I certainly do. So while wandering around Lowe’s for inspiration, I actually did find it – at the faux finishing section of the paint aisle. I found a few ideas immediately right there, first with a metallic finish that I thought would be cool and then a secondary stippling idea that I wasn’t too impressed with but I took home anyways just to consider it. At home, I realized the metallic idea, while cool, just wasn’t right for what my bathroom tiles had in them. Then the stippling idea took center stage – and I then saw that it matched the pattern on the tile perfectly. So back to Lowe’s I went and got those supplies (the base paint, the translucent glaze and a stippling brush) and applied the base coat that afternoon. You had to let it dry completely before putting the glaze on, so off I went with my friends that evening to see Pirates of the Caribbean 3!

Perhaps Dad is reacting to the adhesive smell?
26-May-2007 10:47, Canon Canon PowerShot SD900, 2.8, 7.7mm, 0.017 sec, ISO 141

Me hard at work tiling the floor
26-May-2007 10:53, Canon Canon PowerShot SD900, 2.8, 7.7mm, 0.017 sec, ISO 141

I LOVE tiling
26-May-2007 10:53, Canon Canon PowerShot SD900, 2.8, 7.7mm, 0.017 sec, ISO 141

All the full tiles in place
26-May-2007 11:00, Canon Canon PowerShot SD900, 2.8, 7.7mm, 0.017 sec, ISO 141

Now the fun part with custom-cutting tiles to fit the small areas
26-May-2007 11:23, Canon Canon PowerShot SD900, 2.8, 7.7mm, 0.017 sec, ISO 141

Ta-Dah!
26-May-2007 12:48, Canon Canon PowerShot SD900, 2.8, 7.7mm, 0.017 sec, ISO 141

The base coat of Midnight Blue satin paint up and ready
26-May-2007 19:00, Canon Canon PowerShot SD900, 2.8, 7.7mm, 0.017 sec, ISO 141

A slightly lighter view
26-May-2007 19:00, Canon Canon PowerShot SD900, 2.8, 7.7mm, 0.077 sec, ISO 141

Getting an idea of the color with the tile floor
26-May-2007 19:21, Canon Canon PowerShot SD900, 2.8, 7.7mm, 0.017 sec, ISO 141

Where the new vanity would go
26-May-2007 20:27, Canon Canon PowerShot SD900, 2.8, 7.7mm, 0.017 sec, ISO 141
27 May 2007 – Finishing the Paint and getting the vanity/sink ready
My faux finishing needed to get completed before we could do too much so that was what I got knocked out of the way first – going to town on the blue base coat with the Bluebell glaze on a stippling brush. I made sure to practice my technique on those parts of the wall sure to be covered by the vanity, so I think that by the time I got to highly visible walls, I didn’t do that bad a job. I’m sure experts would agree that my end result is not exactly what stippling is supposed to look like, but I like the end result and it looks freakishly like the blue pattern in the floor tiles, which is what I was going for. So score one for me!
After that was done, then it was time to determine ideal placement of the vanity with the sink on it, and to also get the baseboard and chair rail replacements, which is what Dad and I spent some time at Lowe’s accomplishing. Once we got back (Lowe’s on the weekends is certainly more crowded than on weekdays and evenings, let me tell you), Dad was able to show me how to successfully use my brand new jigsaw to cut pieces of baseboard and install them (even using a finishing nail set!). They went home and I ended up finishing most of the baseboards, securing the vanity to the wall, installing the new Delta faucet to my sink, and mounting the sink to the vanity and wall. Finally, I was able to succesfully reattach the toilet to the floor and have it work again, without leaks. Sweet. After all that excitement, I went over to Jeff’s for Game Night, which involved a great round of Uno Attack! (I have yet to meet someone who after playing this game didn’t Love it) and a game called Shout at TV which I rocked at. We even played a second round in which 7 of them played against me and I still won.

My stippling efforts done - I like it!
27-May-2007 13:04, Canon Canon PowerShot SD900, 2.8, 7.7mm, 0.017 sec, ISO 141

Where the vanity would go
27-May-2007 13:04, Canon Canon PowerShot SD900, 2.8, 7.7mm, 0.017 sec, ISO 141

My window seat slash tool bench
27-May-2007 13:04, Canon Canon PowerShot SD900, 2.8, 7.7mm, 0.017 sec, ISO 141

First piece of baseboard installed
27-May-2007 14:03, Canon Canon PowerShot SD900, 2.8, 7.7mm, 0.017 sec, ISO 141

The sink and faucet are one
27-May-2007 14:23, Canon Canon PowerShot SD900, 2.8, 7.7mm, 0.017 sec, ISO 141

Vanity in its new home
27-May-2007 16:05, Canon Canon PowerShot SD900, 2.8, 7.7mm, 0.017 sec, ISO 141

With the sink now in place too
27-May-2007 17:01, Canon Canon PowerShot SD900, 2.8, 7.7mm, 0.017 sec, ISO 141

Baseboard behind the toilet installed...
27-May-2007 17:01, Canon Canon PowerShot SD900, 2.8, 7.7mm, 0.017 sec, ISO 141

...because it was time to make the toilet work again
27-May-2007 17:43, Canon Canon PowerShot SD900, 2.8, 7.7mm, 0.017 sec, ISO 141

Final piece of long baseboarding installed on the towel wall
27-May-2007 18:56, Canon Canon PowerShot SD900, 2.8, 7.7mm, 0.017 sec, ISO 141

Detail of Toilet and Sink
27-May-2007 18:56, Canon Canon PowerShot SD900, 2.8, 7.7mm, 0.017 sec, ISO 141

There's my tool bench again
27-May-2007 18:56, Canon Canon PowerShot SD900, 2.8, 7.7mm, 0.017 sec, ISO 141

Grimacing Susan at Game Night
27-May-2007 21:57, Canon Canon PowerShot SD900, 2.8, 7.7mm, 0.017 sec, ISO 141

Dallas loves game night
27-May-2007 21:57, Canon Canon PowerShot SD900, 2.8, 7.7mm, 0.017 sec, ISO 141

Dave and Jeff getting some snacks
27-May-2007 21:57, Canon Canon PowerShot SD900, 2.8, 7.7mm, 0.017 sec, ISO 141

Jeremy, KD and Eric eagerly await Uno Attack time
27-May-2007 21:57, Canon Canon PowerShot SD900, 2.8, 7.7mm, 0.017 sec, ISO 141
28 May(+) 2007 – Finishing Touches
Day 4 of the project found me ready for it to be done. It was very cool to have done this on our own, but after a certain amount of time, I think I was ready for a break but I also knew it had to be done. Regardless, I probably wasn’t the most happy person this day; grouchy may be more accurate of a term. Added to my mood was the fact that I hadn’t connected the faucet correctly to the sink (it leaked the first time) and that we had to get more plumbing stuff as the supply lines from the old faucet were too short for this one and we had to get more drain pipe. Luckily Dad knows a thing or two about all this stuff and was able to get it all working wonderfully. Sorry for being a jerk that day, dad! After all that fun, including hanging the new mirror (which went pretty easily as it had one of those self-leveling hanger bars), Dad and Pat left and I did some of the easier finishing touches, like putting up all the new chrome fixtures and painting the upper walls white (turns out that while I thought the original color was white, I was wrong – in fact it’s quite obvious now that it was a very off white/brown color; who knew?). All that remains now is for the lighting to be replaced and for my shelves to go up. I think I’ve found a place for my vertical shades-of-blue harbor painting as well. Sweet.
Anyways, here are photos from what my bathroom currently looks like (sans new lights and shelves). Expect to see the 100% completion pics sometime this upcoming weekend.

Working on the fun plumbing aspect of the vanity and sink
28-May-2007 11:58, Canon Canon PowerShot SD900, 2.8, 7.7mm, 0.017 sec, ISO 183

Ah...done. You can see the blue rug back in place as well as the new chrome TP holder
28-May-2007 18:54, Canon Canon PowerShot SD900, 2.8, 7.7mm, 0.017 sec, ISO 141

Towel wall
28-May-2007 18:54, Canon Canon PowerShot SD900, 2.8, 7.7mm, 0.017 sec, ISO 141

28-May-2007 18:54, Canon Canon PowerShot SD900, 8.0, 7.7mm, 0.017 sec, ISO 141

Notice the new mirror and shelf over my sweet sink
28-May-2007 18:54, Canon Canon PowerShot SD900, 2.8, 7.7mm, 0.017 sec, ISO 141

Towel wall
28-May-2007 18:55, Canon Canon PowerShot SD900, 8.0, 7.7mm, 0.017 sec, ISO 141

29-May-2007 21:03, Canon Canon PowerShot SD900, 2.8, 7.7mm, 0.017 sec, ISO 141

View from the shower
29-May-2007 21:03, Canon Canon PowerShot SD900, 2.8, 7.7mm, 0.1 sec, ISO 141

29-May-2007 21:04, Canon Canon PowerShot SD900, 2.8, 7.7mm, 0.1 sec, ISO 141

Detail on the Delta faucet
29-May-2007 21:04, Canon Canon PowerShot SD900, 2.8, 7.7mm, 0.077 sec, ISO 141

Detail on the sink
29-May-2007 21:05, Canon Canon PowerShot SD900, 8.0, 7.7mm, 0.017 sec, ISO 141

29-May-2007 21:05, Canon Canon PowerShot SD900, 8.0, 7.7mm, 0.017 sec, ISO 141

Hand towel and mirror detail
29-May-2007 21:05, Canon Canon PowerShot SD900, 2.8, 7.7mm, 0.05 sec, ISO 141